Using MetaModule with Rack
What is VCV Rack?
VCV Rack is a "Virtual Eurorack Studio" that runs on a Mac, Windows, or Linux computer. There are thousands of free modules available, making it one of the most popular virtual modular platforms. There is a free open-source version, and a paid Pro version.
VCV Rack is owned and maintained by VCV and is not affiliated with 4ms Company.
You can create patches on your computer in VCV Rack and play them on the MetaModule. This is the preferred workflow for complex patches involving lots of modules, patch cables and/or mappings.
Installing the 4ms modules into VCV Rack
Before you can use VCV Rack to create patches for your MetaModule, you need to install the 4ms modules into VCV Rack on your computer.
-
1. Install from VCV Rack Library
Go to the 4ms Company page of the VCV Rack Library
-
2. Click Subscribe
Click "Subscribe" to add all 4ms modules to your account. Subscribing will also tell the VCV Rack program to check for updates as we release bug fixes and new modules.
Alternatively, you could click "Add All", which will add all modules that exist at the current time, but you will not be notified when future modules are added.
The VCV Rack Library requires you to create a free account.

-
3. Quit and re-launch VCV Rack
Make sure you are logged into your account from the VCV Rack Program (Library menu).
If there is an item called
4ms Companyin the Library menu, click it to install the updated 4ms plugin.Restart VCV Rack (quit and re-open).
Right-click (or control-click) on any empty rack space to open the Add Module page and see the 4ms modules.
How to install manually
There is normally not any reason to install plugins manually. However, if you were asked by Support to try a special version, or are beta-testing, then here is the procedure to do a manual installation.
Creating patches
-
1. Create a patch in VCV Rack
Add modules, patch them together, and set knobs and switches like you would do on a hardware Eurorack system. If you need help using VCV Rack, there are many video tutorials on YouTube. Use the VCV Audio module to listen to your work as you patch.
All modules from 4ms are compatible with the MetaModule, plus about 800 more!
See the FAQ for more information, or browse the complete up-to-date list on the Plugins page
For an example patch, try SpringsintoCaves. Or browse the example patches

-
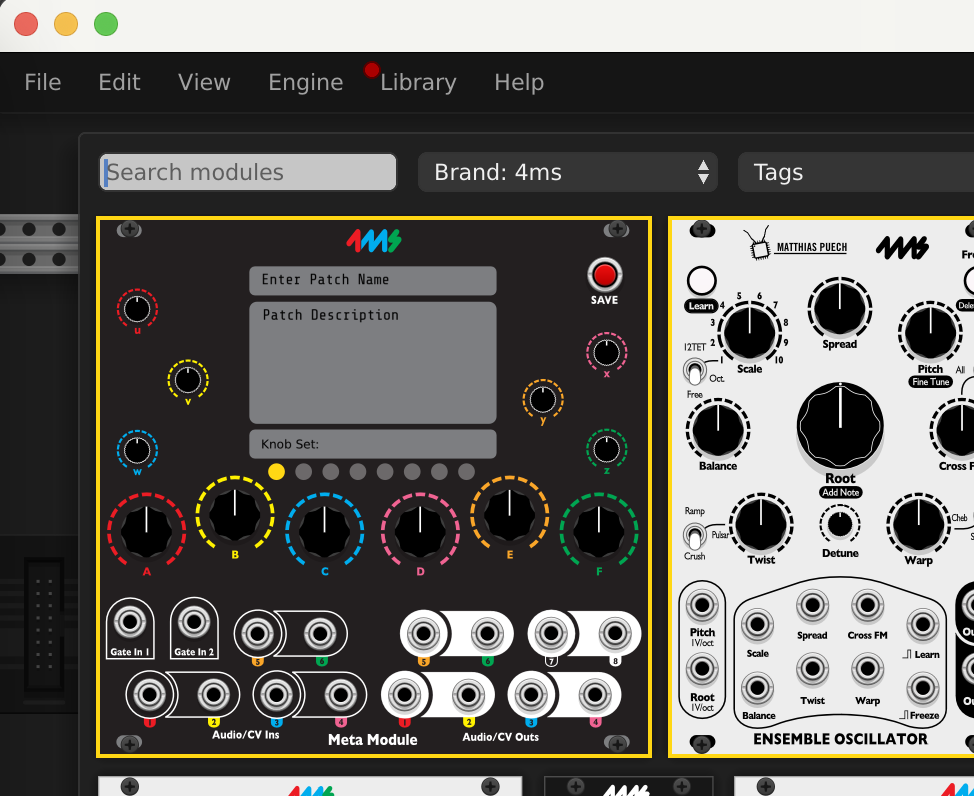
2. Add the MetaModule
Right-click (or control-click) on an empty rack space to display the list of modules. Find the MetaModule Hub (search for MetaModule or browse the 4ms brand).
-
3. Create Knob Mappings
First, click the colored ring around any knob on the MetaModule Hub.
Then click on the knob, button, switch, or slider you want to map to.
Tip: if you're zoomed out, it might be hard to click the colored ring. Shift+click anywhere on the knob itself also works.
You can map up to 8 virtual knobs to a single MetaModule knob! This is known as a multi-map

-
4. Create Jack mappings
-
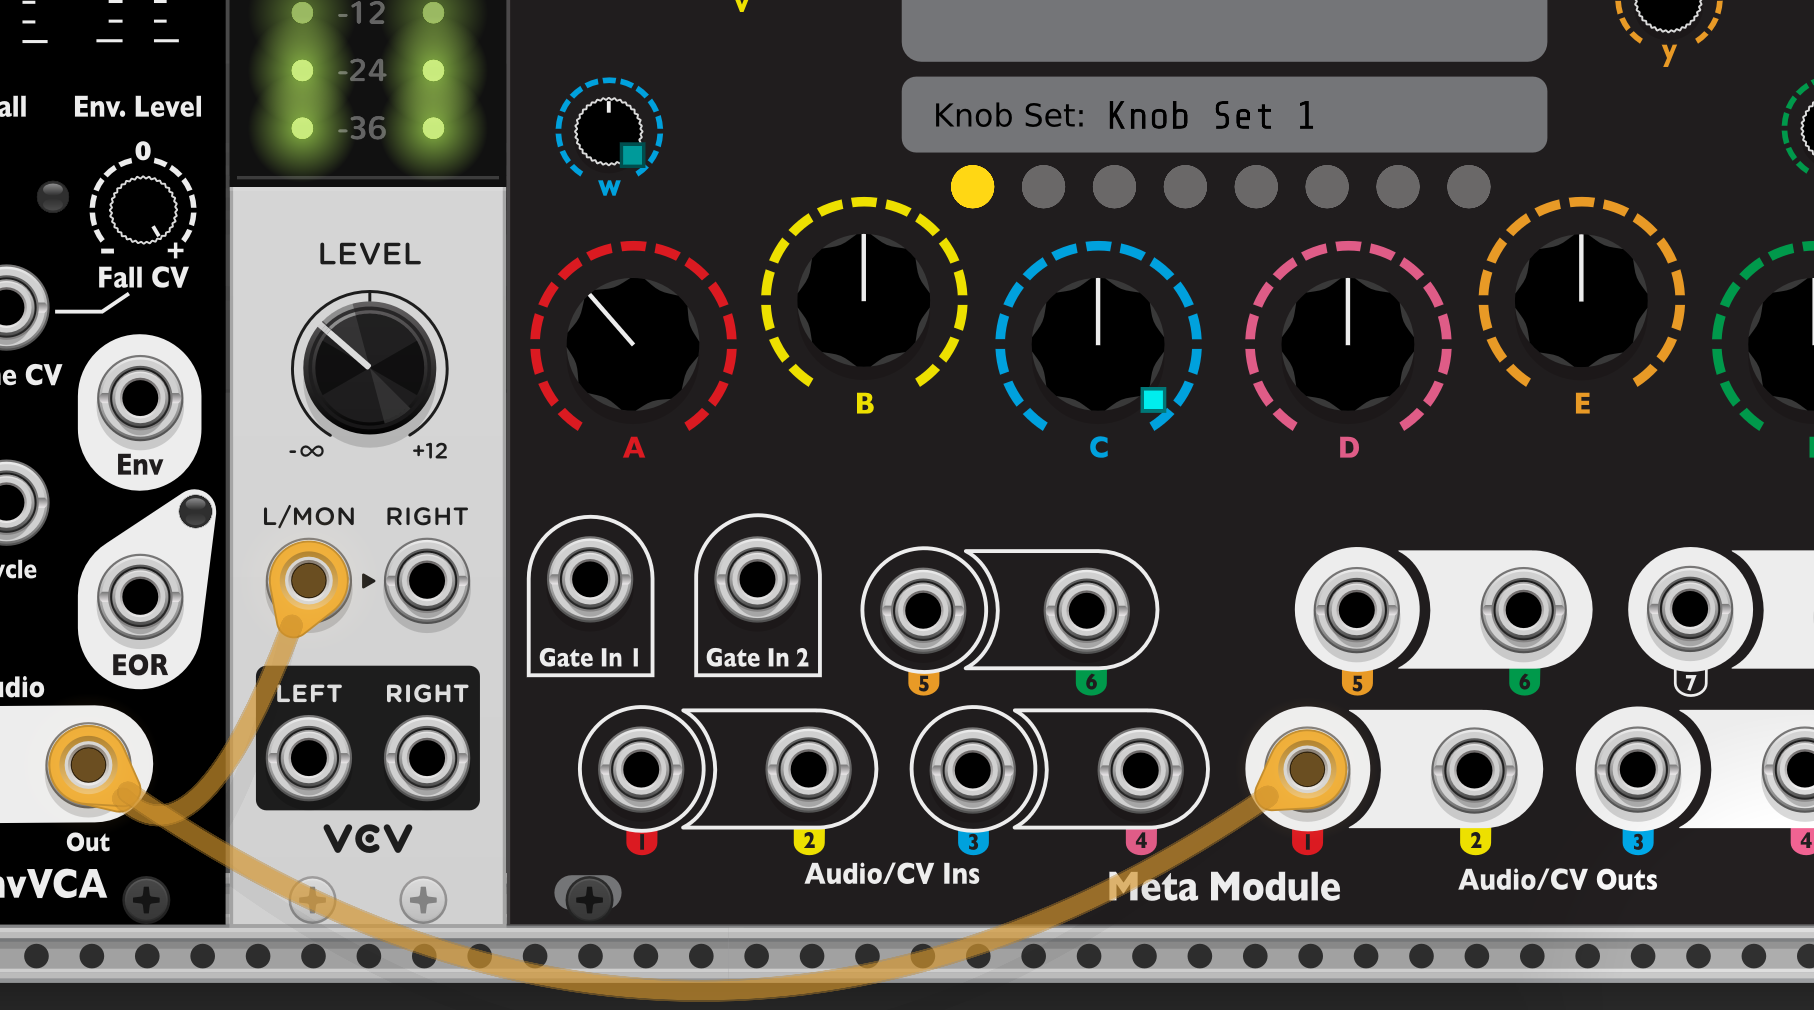
Jacks can be mapped by patching cables to the MetaModule.
For example, if you want signal on the output jack of a VCA module to come out of the physical MetaModule's Out 1 jack, then drag a cable between those two jacks.
-
If you want to also listen to that output, use two cables (Tip: Cmd+drag on Mac or Ctl+drag on Windows/Linux to create a new cable on top)
-
Give the jack a unique name by right-clicking and entering a name in the Alias box.
The MetaModule Hub does not send any signals out, or do anything to the signals that you send in. The cables connected to it are just there to tell the MetaModule what you want to have mapped to each jack when you run the patch on the MetaModule.
-
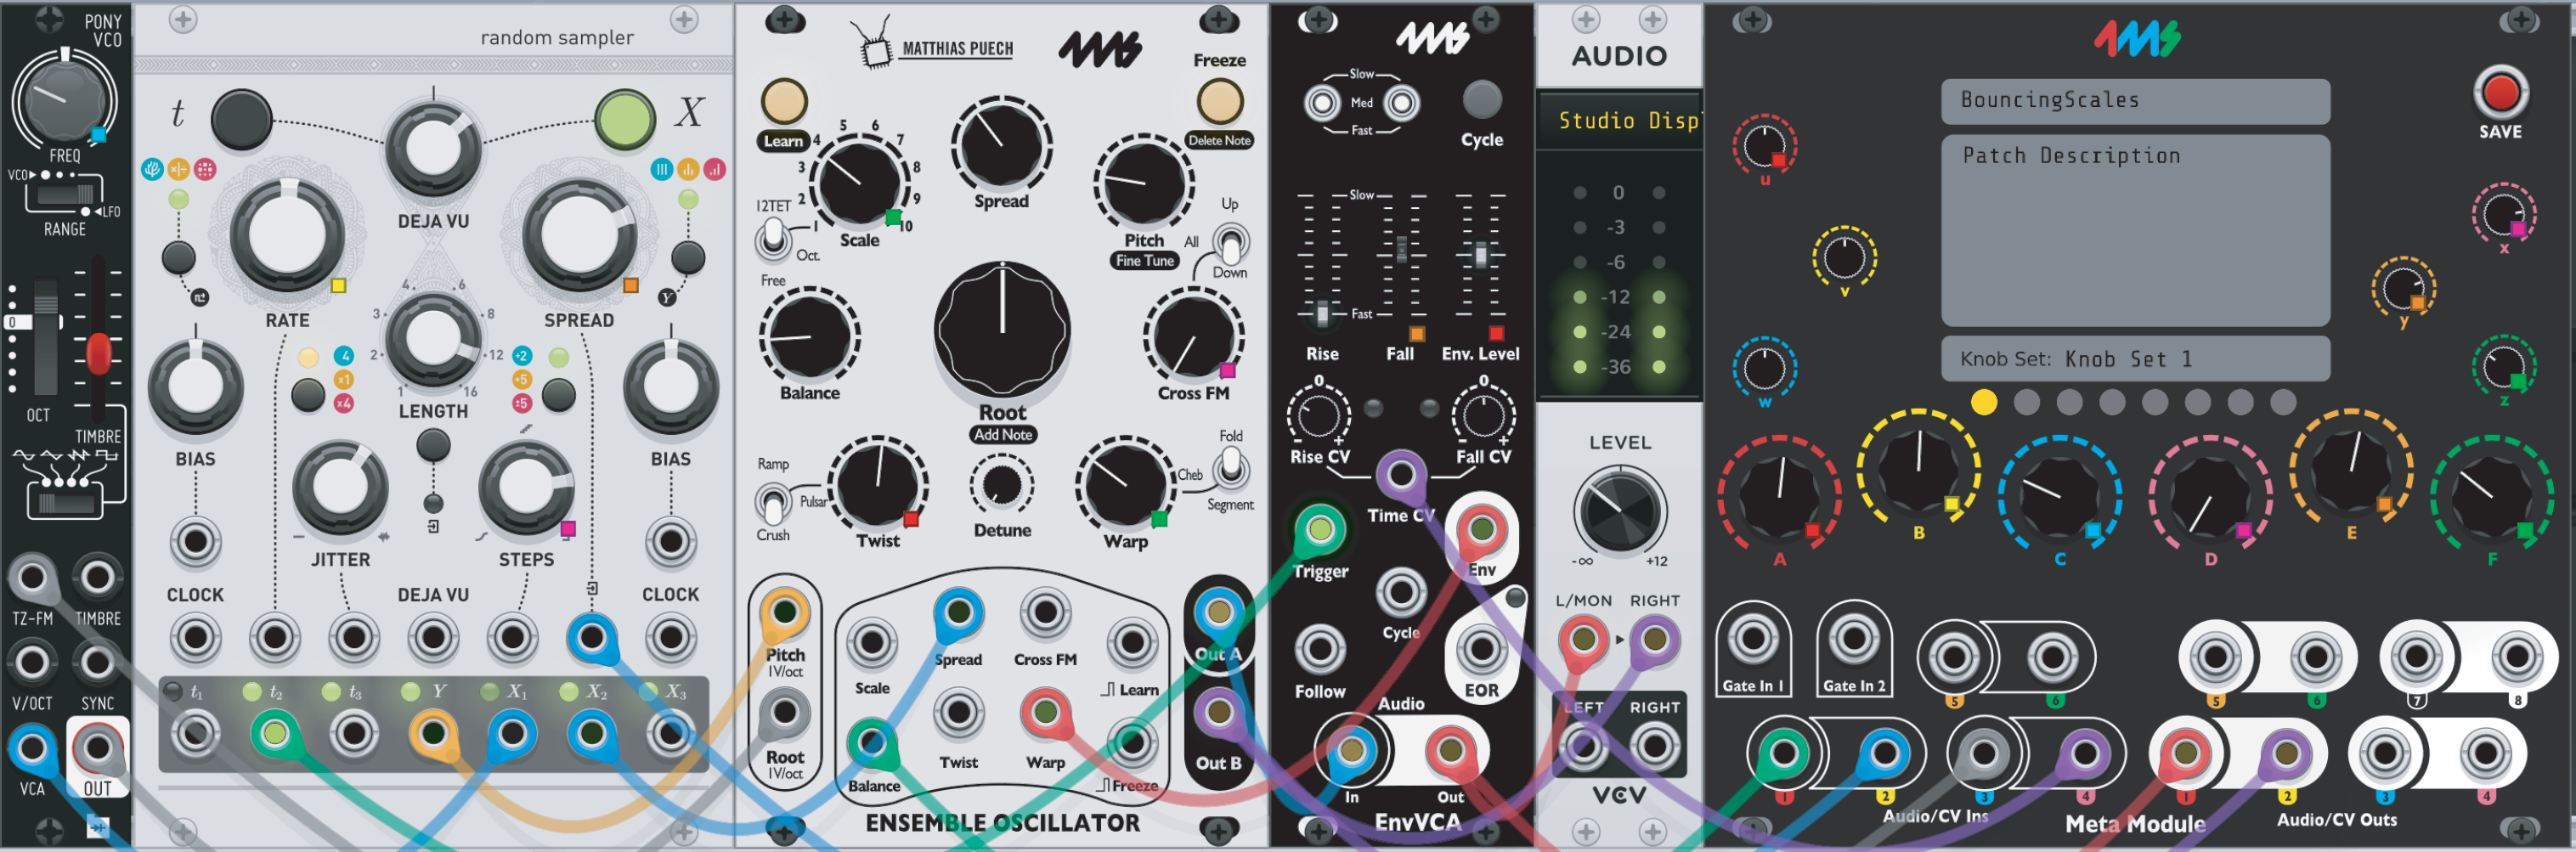
- Completed Patch:
-
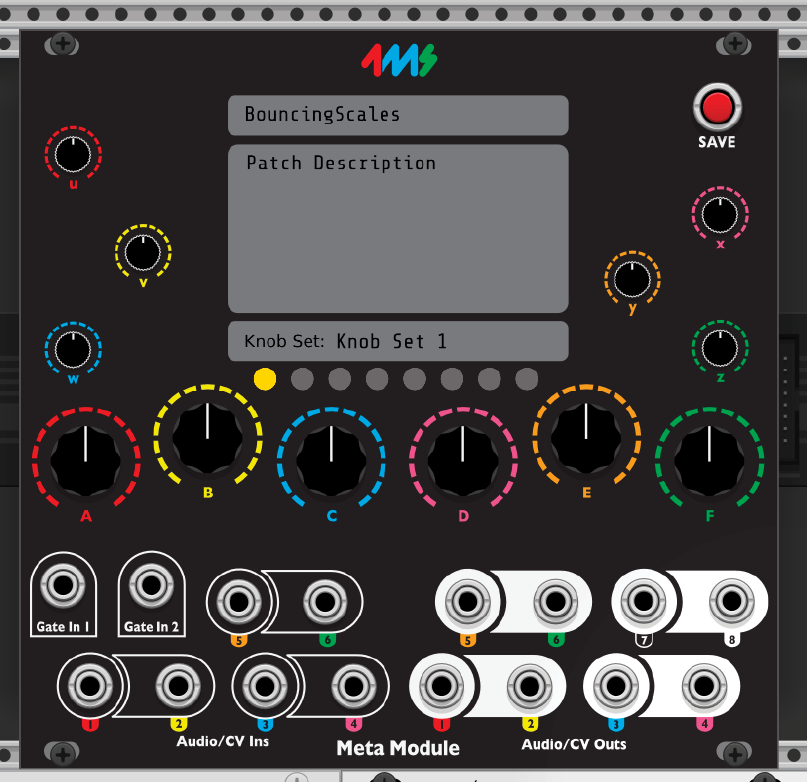
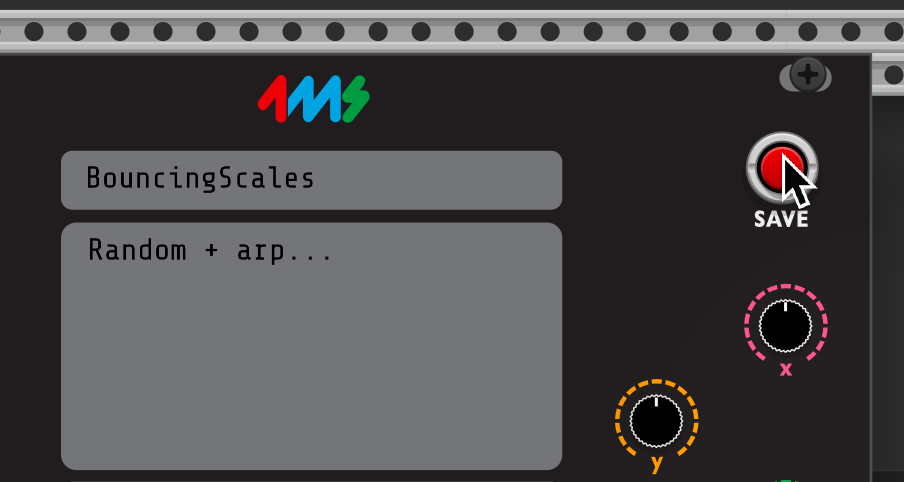
5. Save the Patch
Give the patch a name by typing it in the top box.
You can also give it a description or patch notes in the box below.
Click the red SAVE button.
This will create a file with the
.ymlextension.Note: VCV Rack patch files end in
.vcvand cannot be read by the MetaModule.Save the file on a USB drive or microSD Card. You can save patches in folders to keep them organized. However, the MetaModule will not find patches in sub-folders of folders.
-
6. Load the patch into the MetaModule
-
Insert the disk into the MetaModule.
-
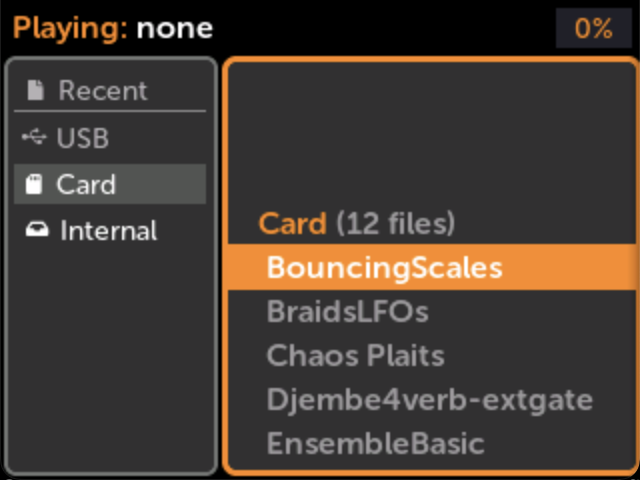
Go to the Patch Selector page and open your patch.
-
Plug Outs 1 and 2 into your output mixer/speakers/headphone amp.
-
Press the Play icon to start/stop the audio.
-
Enjoy!
-
Choosing which modules to include in the saved patch
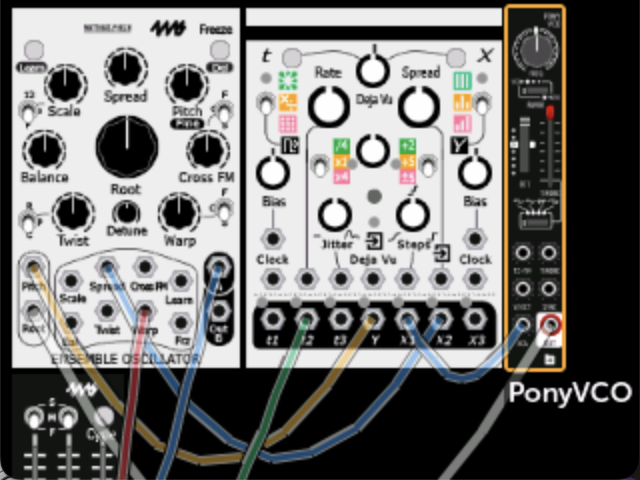
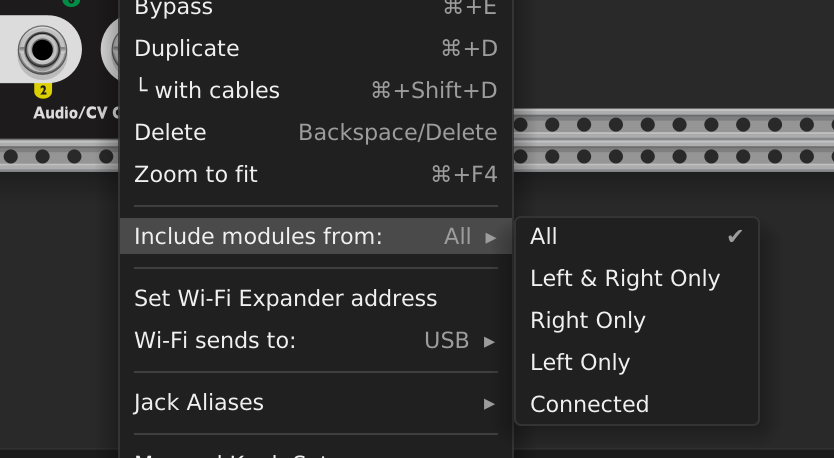
By default, all modules in the VCV Rack patch are written into the MetaModule patch file. You can limit which modules are included by right-clicking the MetaModule Hub and choosing Include Modules from:.
- Right-click the MetaModule Hub and select
Include Modules from:
| Option | What gets included |
|---|---|
| All (default) | Every module in the patch |
| Left Only | Only modules that are physically touching each other in an unbroken chain to the left of the Hub |
| Right Only | Only modules in an unbroken chain to the right of the Hub |
| Left & Right Only | Modules in unbroken chains on either side |
| Connected | Only modules connected to the Hub by cables, directly or through any number of intermediate modules |
This is useful when you have reference modules, utility modules, or work-in-progress modules in the same VCV Rack patch that you don't want to include in the MetaModule patch file.
How to set the name or min/max range of a knob mapping
-
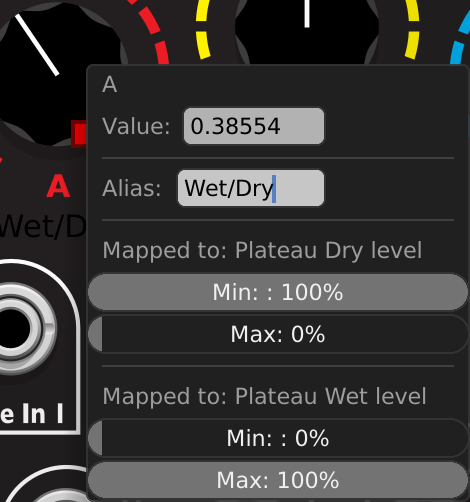
Right-click the MetaModule Hub knob
-
Type in a brief name for the knob mapping if it's helpful for you to remember.
-
Change the Min and Max values if you want to limit the range of the virtual knob. Tip: If you make Max less than Min, the knob will turn "backwards"
-
Double click a Min or Max slider to type in a numeric value. *Tip: You can type expressions like
100/7 -
If you have multiple virtual knobs mapped to this knob, then a separate Min and Max slider will be shown for each one.
-
How to remove a knob mapping
-
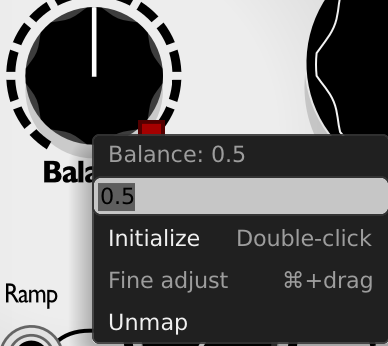
Right-click the MetaModule Hub knob or the virtual module knob
Select
Unmapfrom the menu.
Creating Knob Sets in VCV Rack
A Knob Set is a group of mappings. You can create up to eight Knob Sets in a MetaModule patch and switch between them on the fly when running the patch on the MetaModule.
Knob Sets are a great way to control the entire patch using just the 12 on-board knobs.
See Knob Sets for more information.
Selecting a Knob Set
-
Click one of the yellow circles on the MetaModule Hub
Each circle chooses a Knob Set (1-8).
The knob mappings for the selected Knob Set will be shown in the patch. Creating, editing, and removing knob mappings will change only the current Knob Set.
Mapped knobs won't change their values until you wiggle the MetaModule knobs.

Naming Knob Set
Select a Knob Set and type a name in the box above the yellow circles.
This name will be displayed on the MetaModule.
Setting Suggested Audio Settings
You can embed a suggested sample rate and block size into a patch from VCV Rack. When the MetaModule loads the patch and the Allow patch to override preference is enabled, it will automatically apply these settings.
-
Right-click the MetaModule Hub and select
Suggested Audio SettingsChoose the desired sample rate and block size from the submenus.
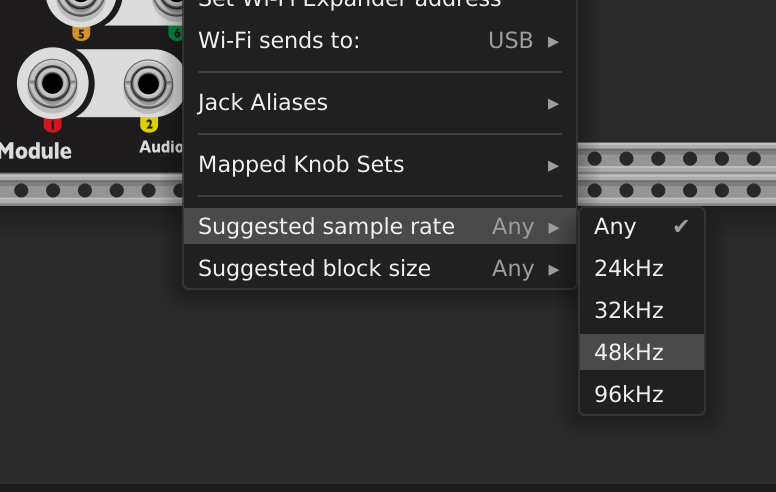
To enable the MetaModule to apply these settings on load, see Allow patch to override in Preferences. You can also view and change the suggested audio settings directly on the MetaModule in the Patch Info window.
Assigning Module Aliases
-
Right-click the MetaModule Hub and select
Module AliasesEach module in the patch is listed. Type a name in the text field next to a module to set its alias. To remove an alias, clear the text field.
In VCV Rack, aliased modules display a colored label at the top of their panels.
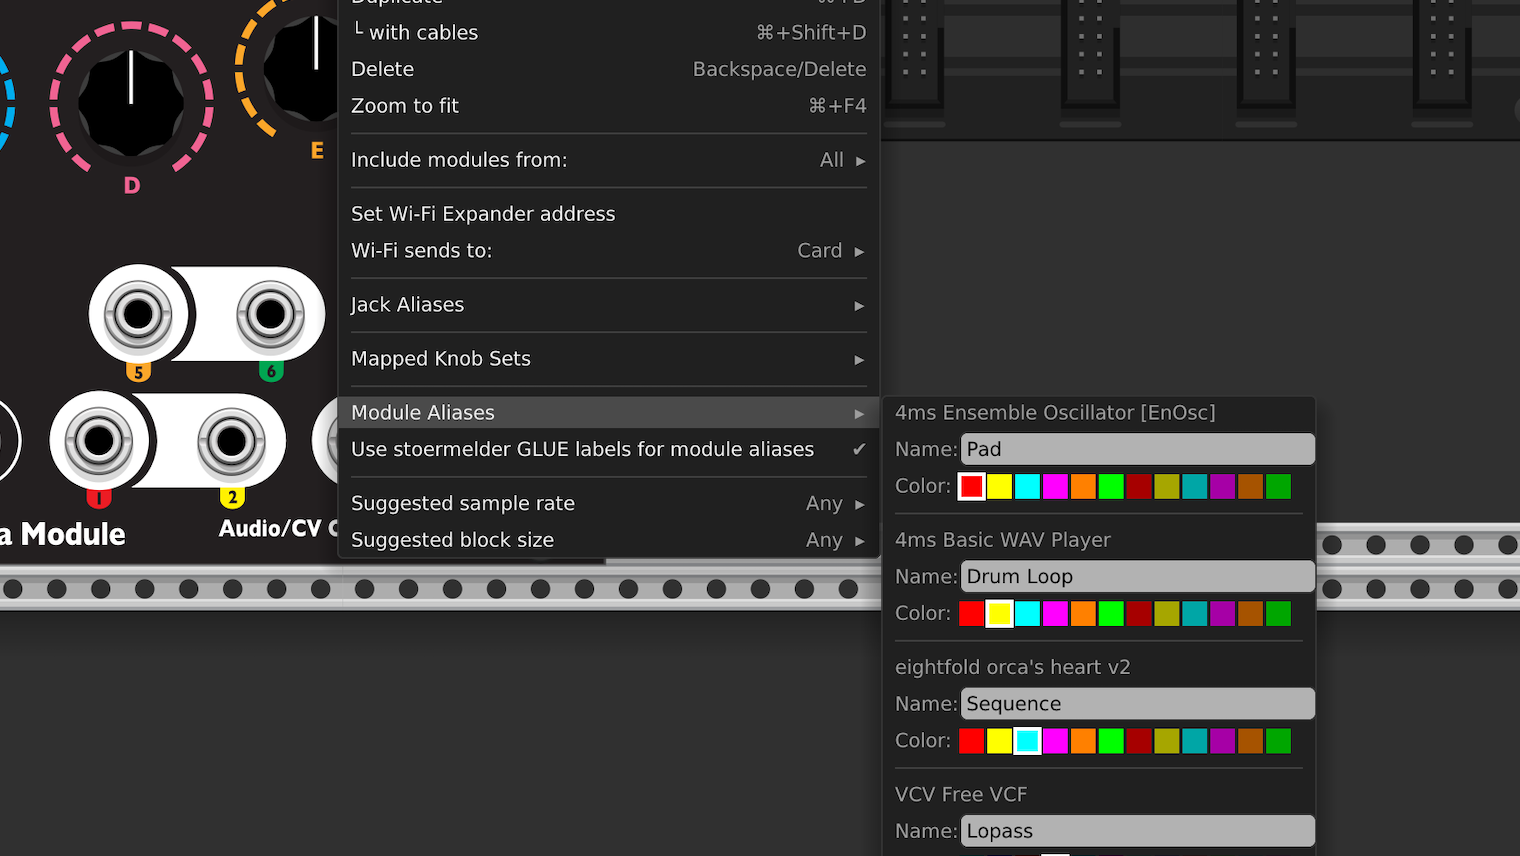
You can also add aliases using the GLUE module from stoermelder.
If a module has both an alias set in the Meta Hub and a label set in GLUE, the Hub alias takes precedence. To use
GLUE without your GLUE labels setting aliases in your MetaModule patch, right-click the Hub and uncheck
Use stoermelder GLUE for aliases.
MIDI Mapping
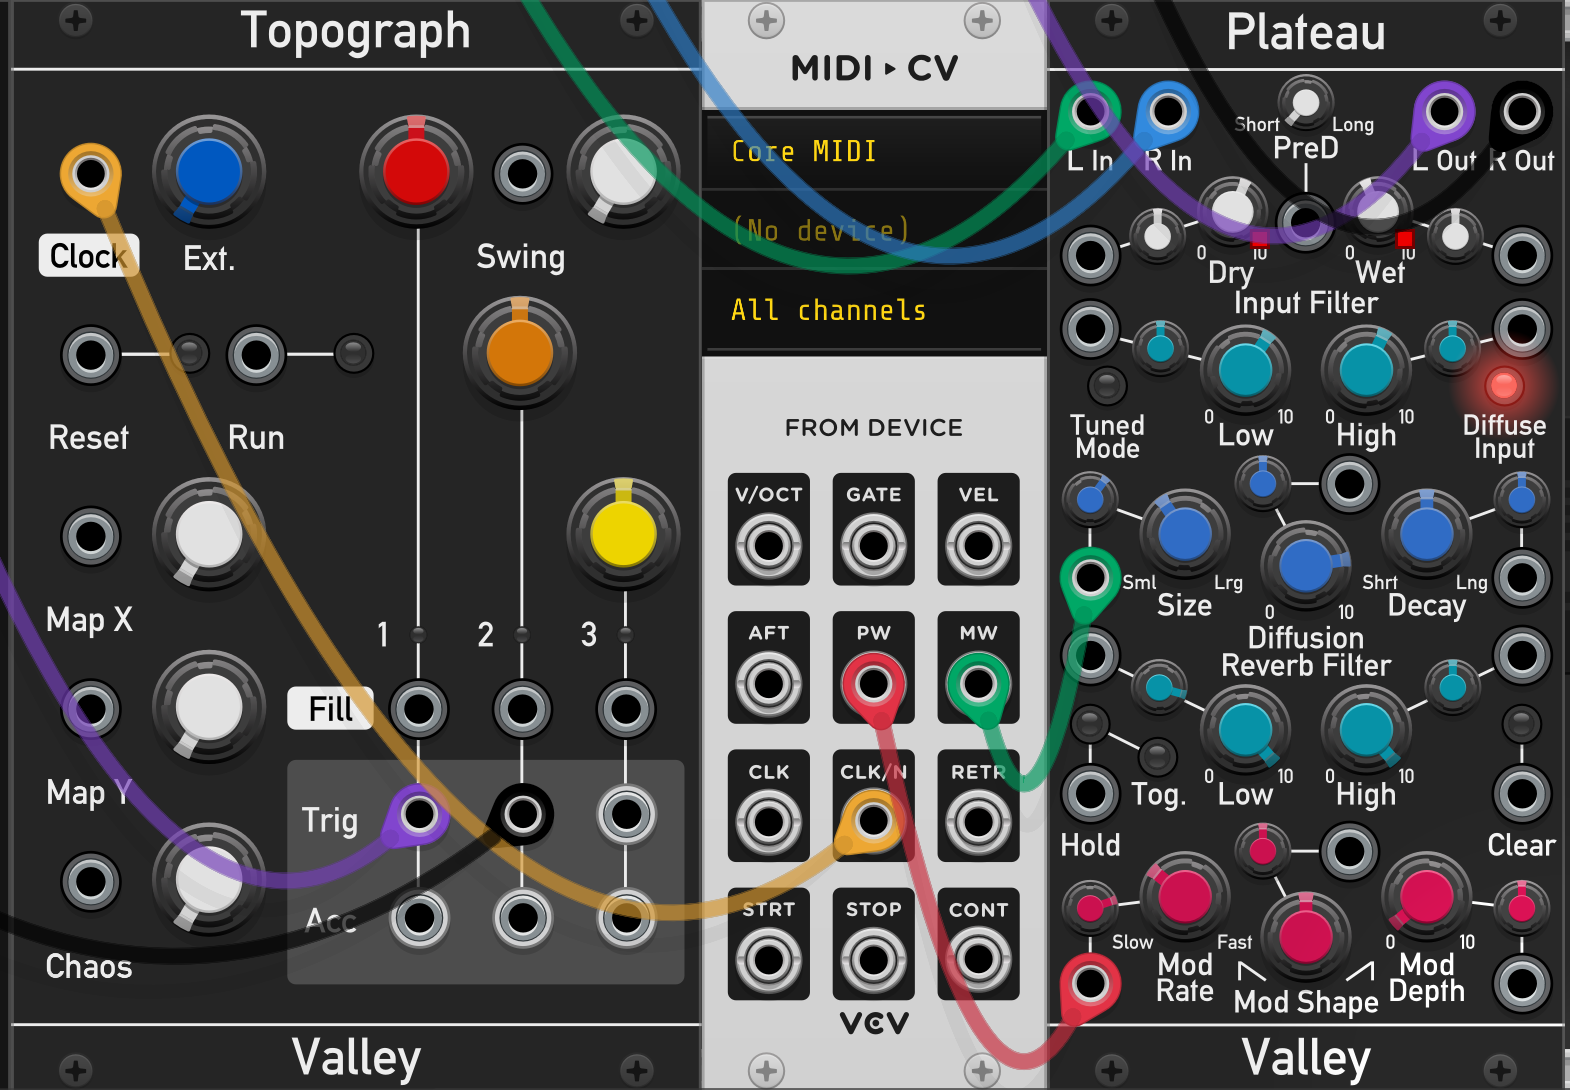
When making patches in VCV Rack, you typically will use the Rack Fundamental MIDI modules (such as MIDI-CV, MIDI-Gate, and MIDI-CC) to create MIDI mappings. All the Fundamental MIDI modules are supported. You can also use MIDI modules from other plugins, they typically will work the same on MetaModule hardware as they do in VCV Rack.
Built-in MIDI vs. RackCore MIDI
Before you send a patch file over Wi-Fi or save it to disk, you can choose how you want the MIDI mappings represented in the patch: as Built-in MIDI mappings, or as RackCore modules.

Right-click the Hub and pick one of:
-
Use built-in MIDI (default): the MetaModule converts the VCV Fundamental MIDI modules' connections into its own built-in MIDI mappings. The MIDI modules themselves do not appear in the patch on the MetaModule — they only tell the MetaModule where you want MIDI routed. In this mode, the MIDI polyphony number is taken from the MIDI-CV module's context menu (or auto-detected if there is no MIDI-CV module). See MIDI Polyphony. Built-in MIDI is more CPU efficient than using RackCore MIDI, but is less flexible.
-
Use RackCore MIDI: the VCV MIDI modules are added to the patch as actual RackCore modules that run on the MetaModule, appearing as normal modules with cables in the patch. The MIDI polyphony number is set by an option in the context menu. The RackCore modules use a little more CPU than built-in MIDI, but they offer more flexibility via the options in the context menu.
The remainder of this section describes the built-in MIDI workflow.
How to map MIDI notes, gates, velocity, and aftertouch
VCV Rack and MetaModule support polyphonic MIDI notes, gates, velocity, and aftertouch. The maximum polyphony number for built-in MIDI is 8. This means that note on/off events will be routed to up to 8 voices. However, each cable can only carry 4 voices, and each jack can only "see" or "send" 4 voices. To acheive 8-note polyphont you will need two polyphonic cables and two of each module.
Typically you will want to limit the number of polyphonic channels to 4 - 8 when creating patches for the MetaModule.
In addition to polyphonic note information, you can map pitch wheel, mod wheel, clock, divided clock, re-trigger, start, stop, and continue.
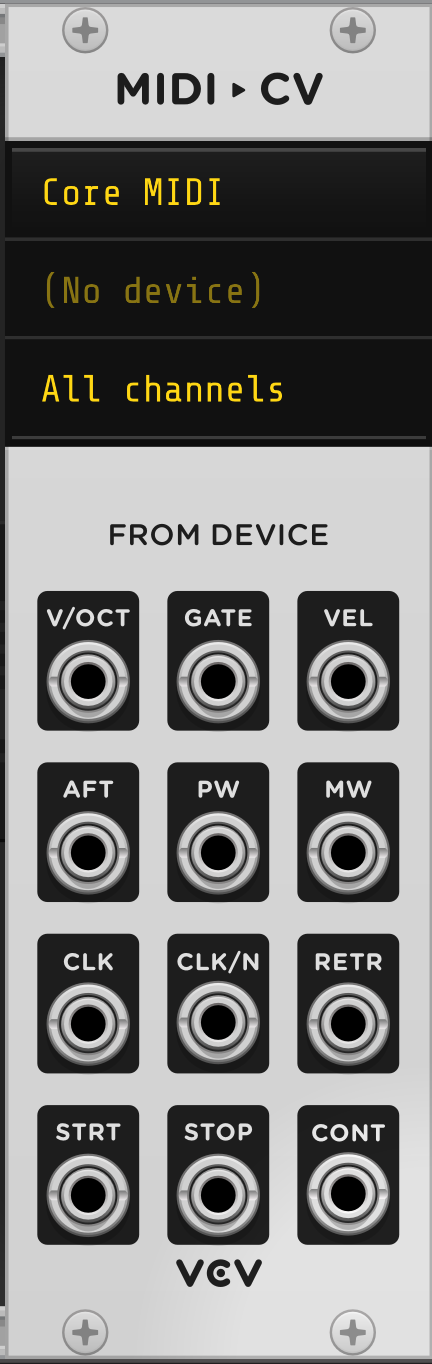
- Add the MIDI CV Module to your VCV Rack patch
-
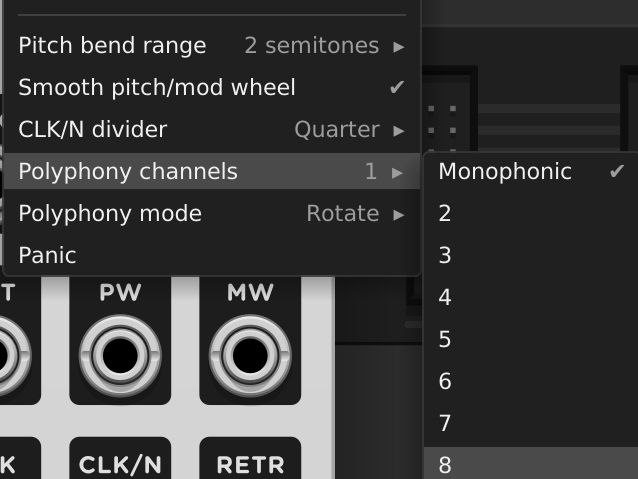
Select the number of polyphony channels
Polyphony is the maximum number of notes that can be played at once.
-
Right-click the MIDI-CV module to see the menu.
-
Select the desired number under "Polyphony channels".
-
-
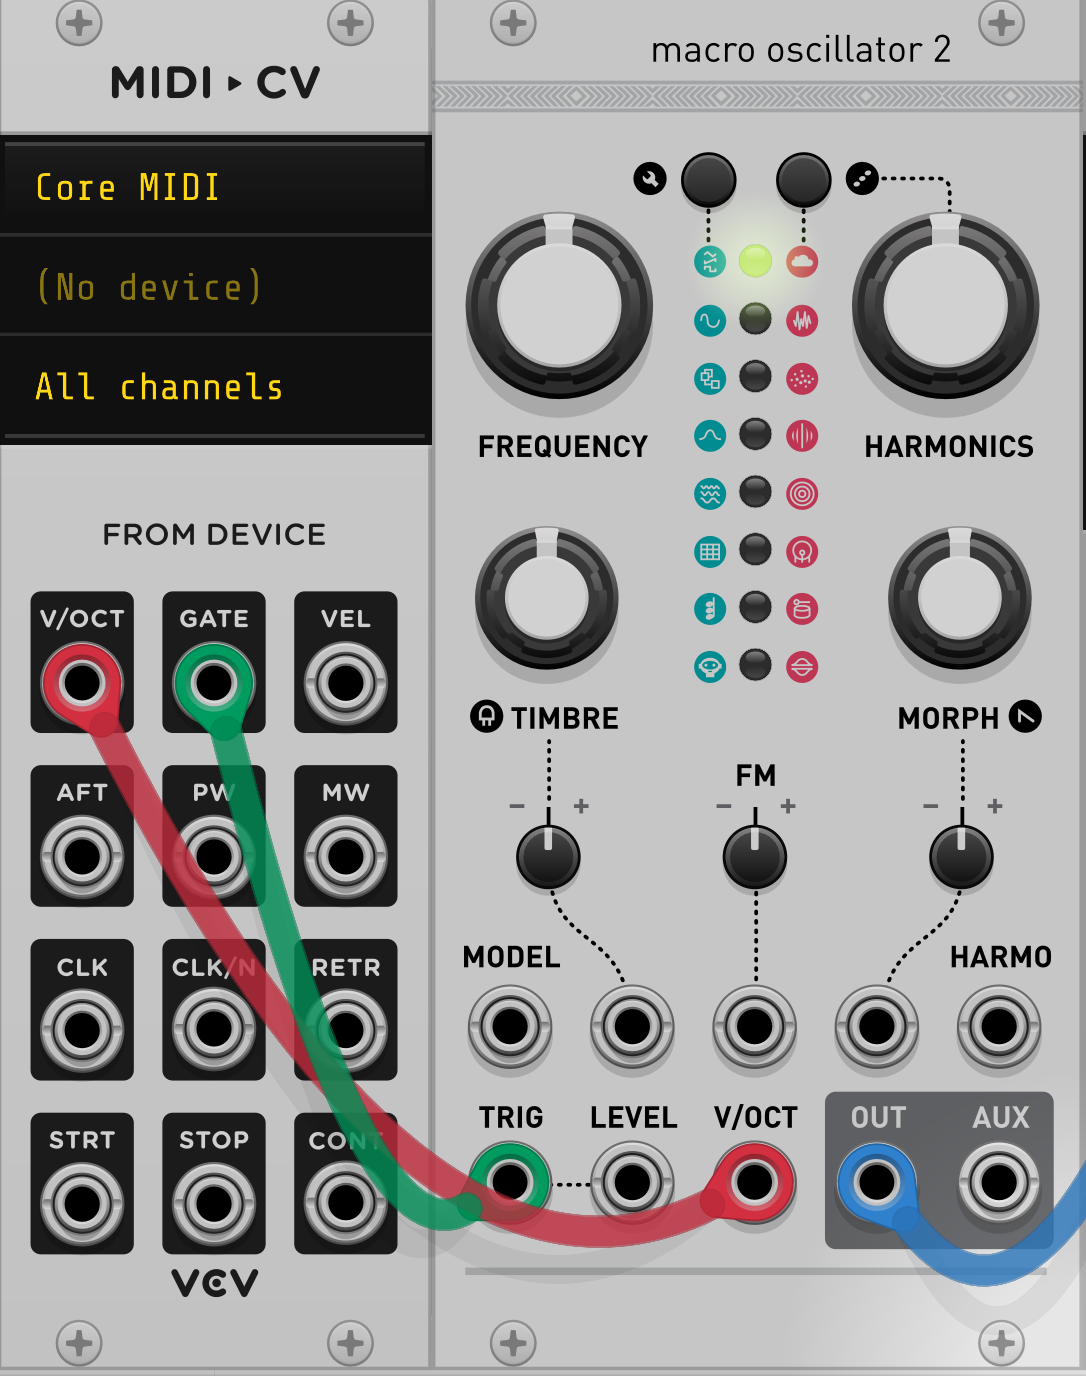
Patch the polyphonic output to a module
Starting in firmware v2.2.0, the MetaModule supports polyphonic cables (up to 4 voices each). For patches of 4 voices or fewer, you can patch the MIDI-CV module's polyphonic outputs directly to your modules' inputs.
If you need more than 4 voices, or if you want to route the voices individually then you can use a Split module to split the polyphonic cable into mono cables (and optionally combine them into groups of 4 using a Merge module).
 { }
{ }How to map other MIDI signals
-
You can map Pitch Wheel, Mod Wheel, Clock, Divided Clock, Retrigger, Start, Stop, and Continue using the MIDI-CV module.
-
You can map MIDI notes to gates by using the MIDI-Gate module.
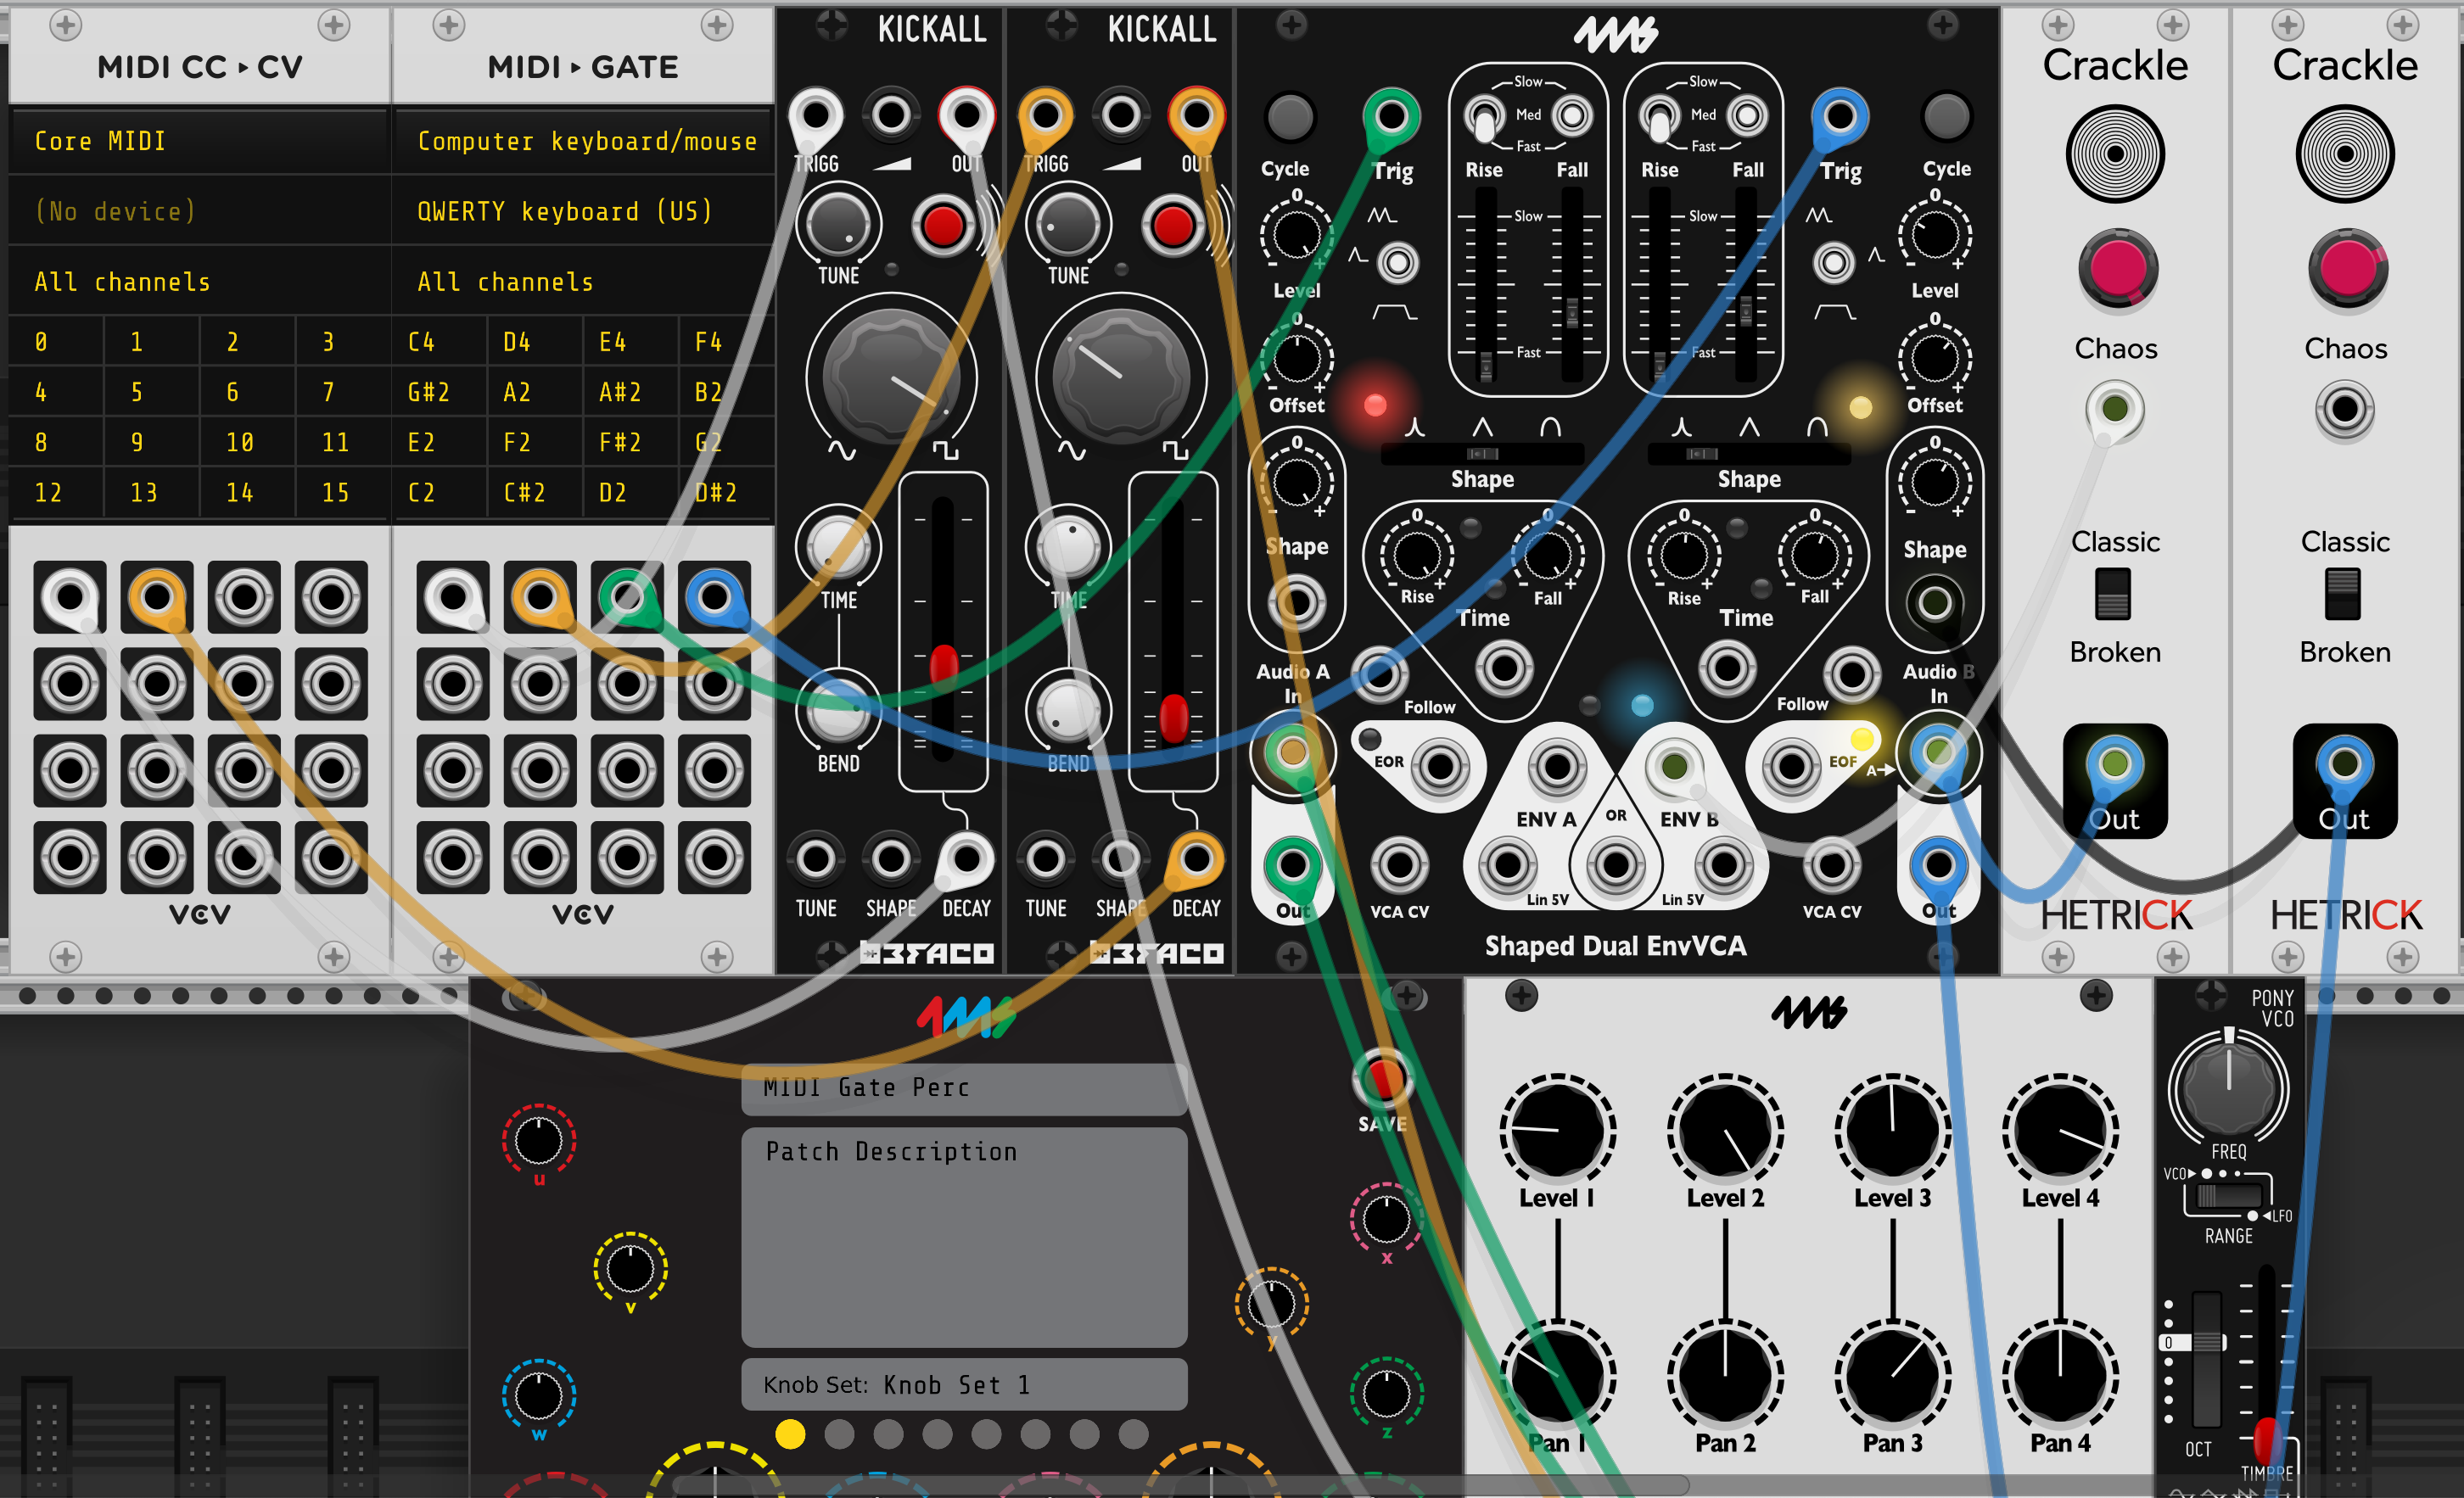
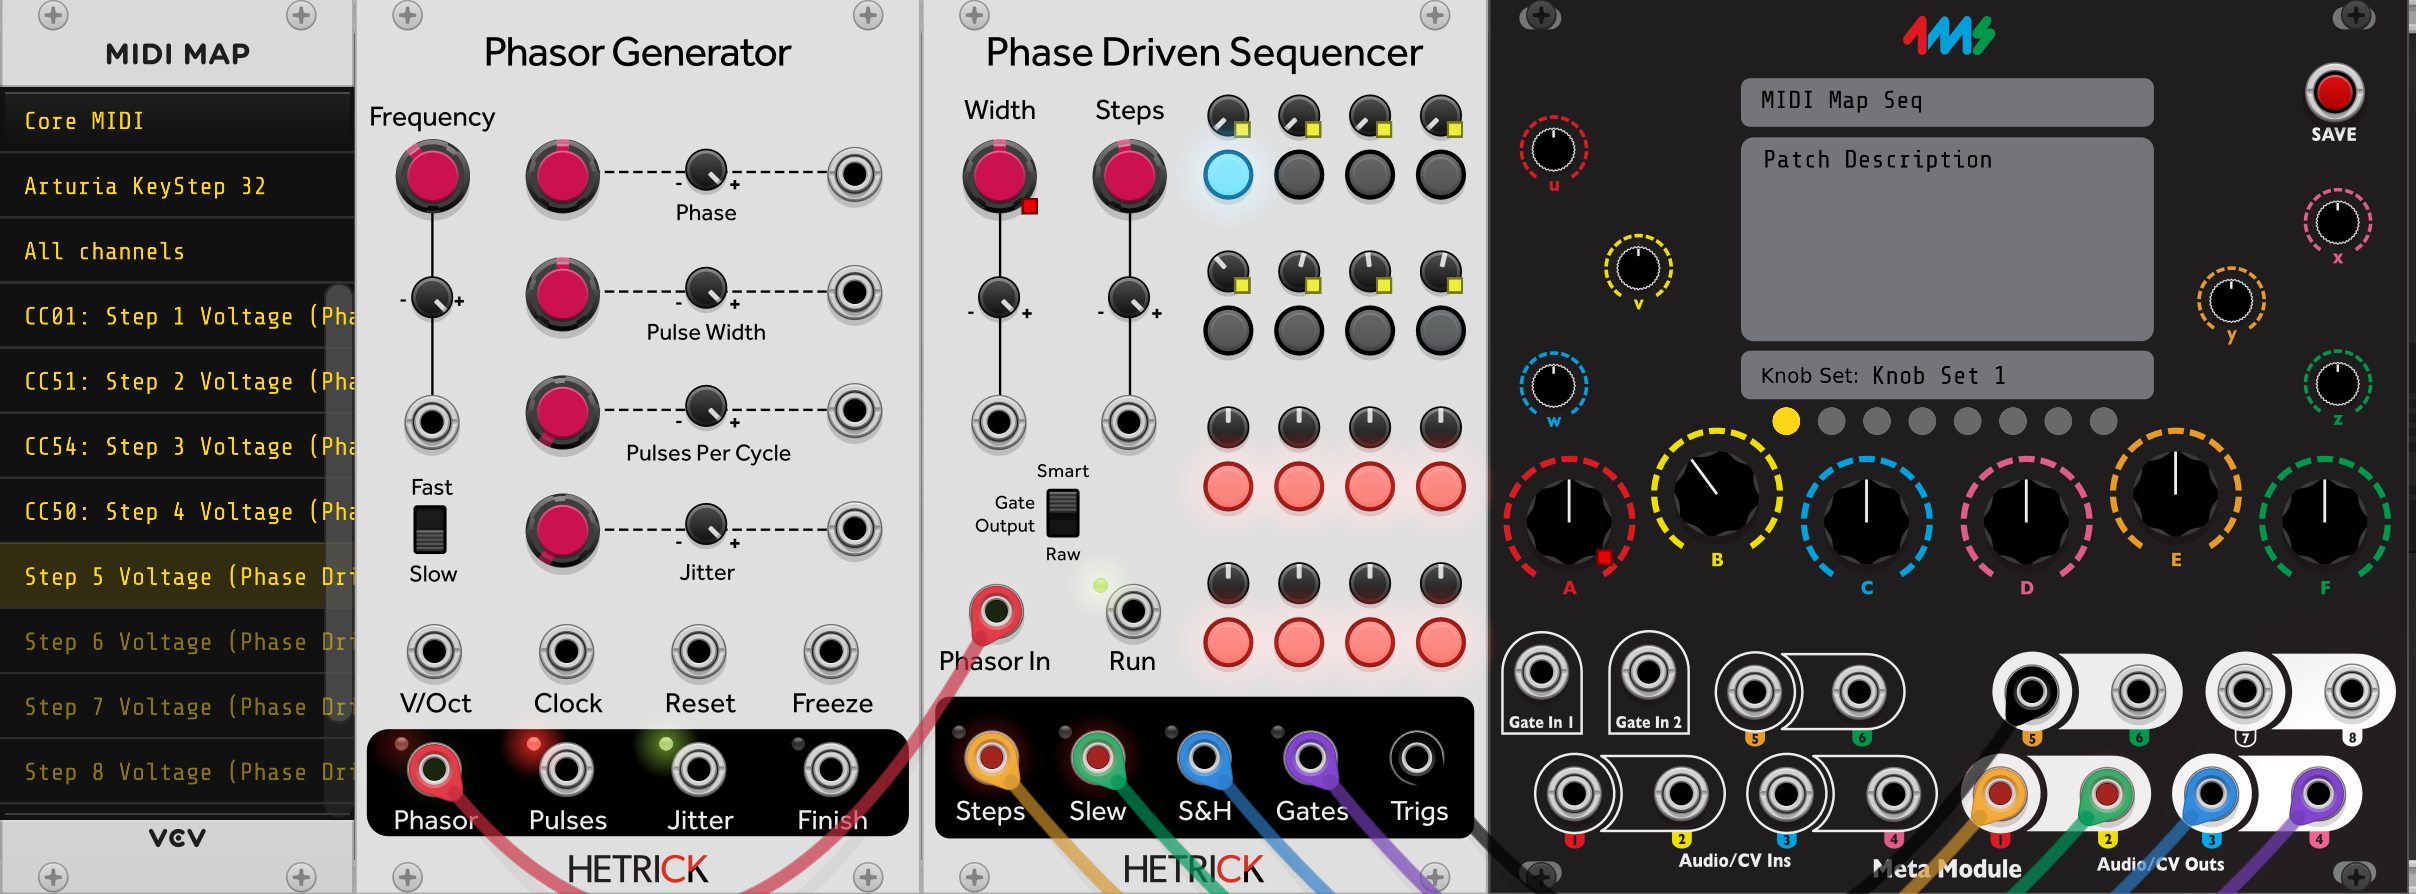
Map MIDI CC signals to jacks using the MIDI-CC-CV module.
-
You can map MIDI CCs to knobs using the MIDI-CC module.
Click on an empty line on the MIDI-CC module, and send a MIDI CC event. Then click on a knob to create the mapping.
Notice that VCV Rack indicates a MIDI mapping with a yellow square. This should not be confused with the yellow square used by Knob B of the MetaModule. If in doubt, hover the mouse over the Knob B ring, and if the other knob's square flashes rapidly then it's mapped to the MetaModule.
Tip: Favorite the MetaModule-compatible modules:
If you have trouble remembering which modules can be run on the MetaModule, one way to keep track of this is to mark all compatible modules as "Favorite" in VCV Rack.
User tenofswords created a python script to do this automatically for you:
4ms-MetaModule-Scripts
Running this requires some basic knowledge of using python scripts. Some discussion is here: MetaModule Forum: MetaModule Tag in Rack to Identify Supported Modules